
Are you about to buy a new bike? Or have you just bought one and something doesn’t feel quite right? That’s probably because you still haven’t done a proper bike fitting. Until now…

We Love Cycling
Bike fitting is a quick, yet complicated process, but it makes all the difference once it is complete. It is of paramount importance in case you want to cover long distances on your bike without experiencing any discomforts or dealing with stubborn injuries.
A bike fit can be a DIY project, or professionals can do it at a bike shop that offers this kind of service. If you have the opportunity to visit a local bike shop that does bike fitting, your best option is to refer to them. However, chances are that you will have to do it yourself; but, don’t worry, it’s not rocket science.
When doing a bike fitting procedure, it is essential to look at three main parameters – bike size, saddle height, and saddle setback. In the next section, we will take a closer look at these parameters and explain some other things of importance for proper bike fitting.
How To Properly Fit A Bike – A Step by Step Guide
If you are entirely new to the bike fitting world, the best approach is to take it slowly, one step at a time. Therefore, we’ve created an easy-to-follow step by step guide which will allow you to do a bike fit at home, entirely by yourself. Take a look below to find out how to start.
#1 – Choose the Right Bike Size

If you have already bought a new bike, then it might be too late for this step. However, if you are still in the planning phase, then keep in mind that this is the most important condition to be able to achieve a proper fit.
If you end up buying a wrong bike size, even the most competent bike fit expert in the world will not be able to fix it. Make sure that the bike you buy is not too big or too small for you – either of these can cause problems later on.
In case your bike size is slightly off, you can correct that by manipulating the saddle height, the stem length, and the saddle setback, which we will explain soon. However, in case you have bought a completely wrong size bike, a proper bike fit will be quite hard to achieve.
Let’s see a few methods you can use to determine which bike size is the right one for you.
See, how to choose the right bike size
Use Bike Size Charts
Bike size charts are the go-to solution for anyone who is buying a new bike and needs to determine which size they need to get. Unfortunately, they are not a fail-proof method, and it’s possible to get the wrong size if you blindly follow their system. To use a bike size chart, all you need to know is your exact height.
The reason errors happen is because different manufacturers use different measuring systems. The biggest problems occur when a manufacturer uses the lettering standard (S, M, L, XL), which does not always realistically depict the exact size of the bike. For example, if you’re buying a Giant model, you might need an L frame, whereas if you’re buying a Diamondback model, maybe XL will suit you better. Therefore, it’s always better to look at the numbers.
- Mountain bikes generally use the standard lettering system (S, M, L, XL) and are pretty similar from one brand to another. However, discrepancies may occur.
- Road bikes are usually represented in both the standard lettering system (S, M, L, XL) and the numerical system. Again, the sizes may differ significantly from one brand to another even if you refer to the numerical sizes. Therefore, your best option is to try your road bike in a local bike shop if possible.
- Hybrid bikes also combine the two sizing standards and are generally easier to fit than road bikes. Hybrid bikes provide a more upright position which means there is more slack for error than with elite road bikes.
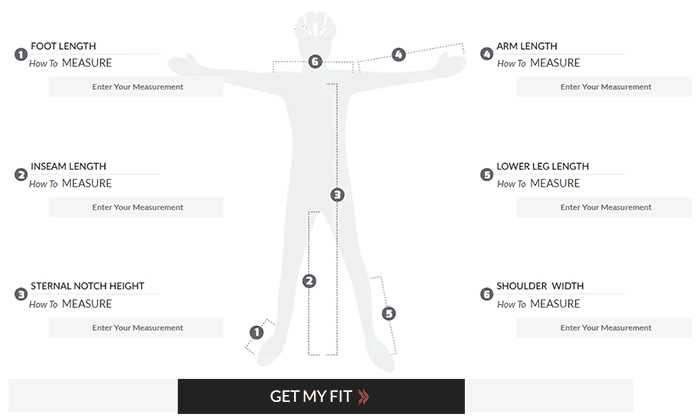
JensonUSA bike fit calculator for example
A bike fit calculator is exactly what you need for a successful DIY bike fitting endeavor. Bike fit calculators are online apps, offered by numerous websites, such as this one provided by Jenson USA.
This method is much more accurate than just addressing a bike size chart because it takes many additional measurements into account. On top of that, it’s quite straightforward to use.
To use it, you will need a tape measure, the same one all tailors have. First, you’ll answer some questions about yourself and your bike requirements, and then you’ll need to enter the measures. The requested measures include leg inseam, foot length, sternal notch height, arm length, and so on.
To get the proper measurements, it is best to have someone help you since it will be quite difficult to do it by yourself.
Even though the result you get will be more accurate than the one you come up with after using only a bike size chart, you should still take it with a grain of salt. Use it as a starting point from where you can move on to find the exact size you need.
Bike Standover Height
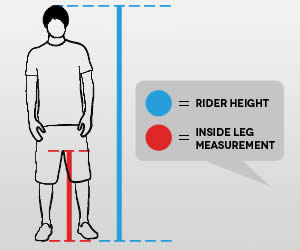 Measuring the bike standover height is one of the oldest methods for guessing the right bike size and also one of the easiest ones. It represents the difference between your inseam length and the bike’s top tube height (closest to the saddle).
This is an excellent method to use when you’re buying a bike online. Most bike manufacturers provide sizing charts of their bikes with bike standover height included. Simply measure your inseam length and compare it with the number you see in the chart.
Note: Some sources claim that road bikes require 1-2 inches of clearance between your crotch and the top tube for a comfortable fit while commuter bikes and mountain bikes require 2-4 inches. However, this method is not 100% accurate either, because some bicycles have a level top tube, while others come with a slanted top tube.
#2 – Bike Saddle Fitting

Bike saddle fitting is the next most important thing after buying the right size bike. If your saddle is not properly fitted, you may experience knee pain, Achilles issues, back pain, groin issues, and so on. Moreover, if you bought a bike that is a bit larger or smaller than you need, you may be able to fix it by fidgeting with the saddle. Let’s see how.
Saddle Height
Adjusting your saddle height is pretty easy, and you can always quickly readjust it if you start feeling any discomfort from it.
There are two ways in which you can do it. When sitting on the bike, place your heel on the pedal in the lowest position. Your heel should be positioned flat on the pedal while your leg is completely straight.
Alternately, you can place your forefoot (the same as when you ride) on the pedal and look for a slight bend in your knee when the pedal is in the bottom position.
Make sure to wear the shoes you will be riding in when adjusting your seat to prevent any inaccuracies later on.
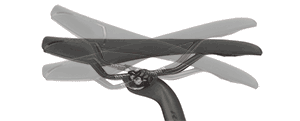
Saddle Setback
 Saddle setback, also known as saddle fore/aft position, allows you to move your saddle backward or forward to get the right fit.
The perfect saddle setback is achieved by looking at the position of your knee when your pedal stroke is at the 3 o’clock position. In this position, your knee should be located exactly above your forefoot.
If your knee is reaching forward too much, pull the saddle back a bit. If your knee is too far back, then push the saddle forward until you find the perfect position.
Saddle Tilt
 Saddle tilt is another very important adjustment which will save your bottom on long rides. Wrong saddle tilt can also cause back pain and other issues, so it’s important to get it right.
As a general rule of thumb, aim for a position that is perfectly level with the ground. This way, your saddle will be able to support the whole weight of your body properly. If you start feeling any pain in your crotch, try changing the tilt slightly downward or upward until you find the position that feels comfortable.
Also, you can use an app called Saddle Adjust to help you find the right angle. It’s available both on the Apple Store and on the Google Play Store. It’s simple to use – open the app, place your phone on top of your saddle, and follow the instructions.
#3 – Handlebar Fitting
Wrong handlebar fitting is responsible for back pain, neck pain, and shoulder pain. It is the place where your hands touch the bike and support at least half of your upper body weight, so finding the right position is crucial. You can adjust the handlebar reach, handlebar height, or change the handlebar size.
Handlebar Reach (Stem Adjustment)
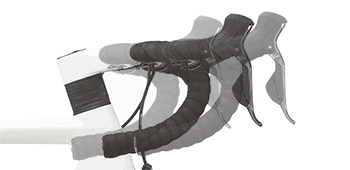 A proper handlebar reach is one of the most important conditions for enjoying long rides. If your handlebar reach is not right, the only way you can change it is by replacing the stem for a shorter or longer one.
If after some time on the bike you start feeling pain in your neck, shoulders, or the palms of your hands, there’s a good chance that you might need to adjust your handlebar reach.
To find the right handlebar reach, hop on your bike and place your hands on the handlebar in a neutral position. Ideally, if you drop a plumb line from the tip of your nose, it should fall an inch in front of the middle of the handlebar. Find a person to help you or take a photo of yourself on the bike to do it properly.
Handlebar Height
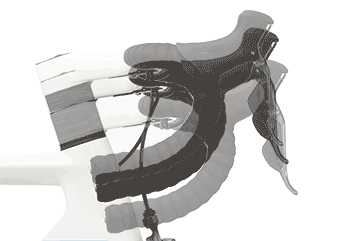
Wrong handlebar height can also be a huge source of discomfort on the bike. Adjusting the handlebar height can be tricky and may require special tools and parts, such as spacers. If you don’t know how to do it, take your bike to a local bike shop.
To find the perfect handlebar height, you should compare it to the height of your saddle. On road bikes, the saddle should be anywhere between 1-4 inches higher than the handlebar. Even more, is fine if it feels comfortable.
For recreational riding and city riding, it’s optimal to have your handlebar and your saddle level. This will provide you with a more comfortable position and give you a better view of your surroundings.
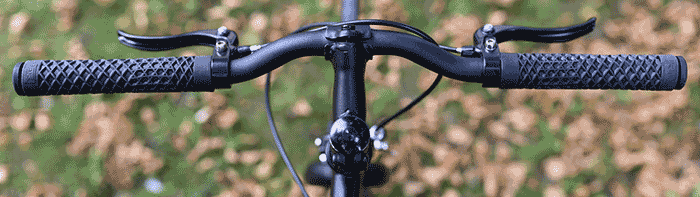
Handlebar Size / Width
![]()
When we talk about handlebar size, we usually refer to the handlebar width, which is important to maintain both performance and comfort.
To have a comfortable fit, the width of your handlebar should be the same as the width of your shoulders. However, some riders prefer having a slightly bigger or smaller handlebar, depending on their style of riding.
City rides might require you to fit through tight spaces, so you would be better off with a more narrow handlebar. On the other hand, full suspension mountain bike riders often prefer a wider handlebar because it gives them more stability and maneuverability.
Pros:
- Done by professionals who know what they’re doing.
- Low chance of errors.
- It takes less time than the DIY approach.
- Takes more variables into account.
- The process is comfortable and simple for the rider.
Cons:
- It can be quite expensive.
- It might be redundant if you’re not riding your bike often.
- Additional adjustments cost additional money.
- It’s inconvenient to do it if there are no bike fitting professionals in your area.
If you are interested in motorized bike and want to know more, you could browse previous articles or visit our Official Website, also choose to leave your message below. If you are interested in electric bike, you can contact us. https://rebrand.ly/ebike-factory